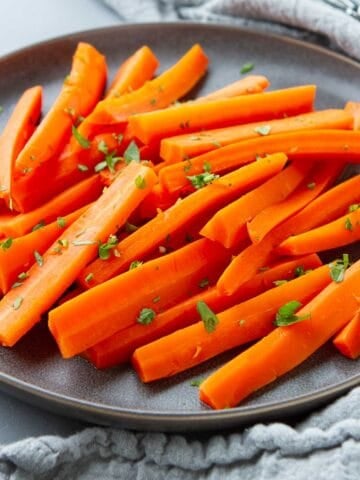
This photo tutorial teaches you how to julienne carrots for all sorts of recipes, from pasta to salads, soups to stews. It's easier than you think!
If you've ever seen the words "carrot, julienned" in a recipe ingredients list, you're probably wondering how to julienne carrots and what that really means. "Julienne" is the fancy term for chopping vegetables into thin, even strips. When referring to carrots, you might know the thin pieces as matchstick carrots.
Whatever you call it, julienned vegetables cook evenly and look a heck of a lot prettier than the haphazard chopping I used to do. It's easy to do and I'll walk you through the steps of achieving perfect julienned carrots.
What is the julienne cut used for?
- Stir fries: Because of their size and shape, julienned carrots cook quickly and evenly, making them ideal for stir-fries.
- Sauces: Make a quick white wine sauce and toss in the carrots to simmer for a couple of minutes.
- Salads: Toss them into your favorite green salad or make use them as a main ingredient in a simple slaw, such as my Jicama & Carrot Slaw (use julienned rather than grated carrots). Serve it as a side or tuck the slaw inside of tacos.
- Toppings: Sprinkle the carrots on top of pizza, such as my Thai-Style Chicken Pizza.
- Sandwiches: Grated or julienned carrots lend the perfect amount of crunch to veggie wraps.
- Garnishes: Use fine julienned carrots to garnish a salad, stew or sauced meat dish.
What size is julienne cut?
According to The Professional Chef, written by the team of chefs at the Culinary Institute of America (I'm inclined to think they know what they are talking about), the julienne cut ranges in size.
- Fine julienne: Measures 1/16 x 1/16 x 1 to 2 inches
- Julienne: Measures ⅛ x ⅛ x 1 to 2 inches
- Batonnet: Refers to cuts ¼ x ¼ x 2 to 2 ½ inches.
That might be a little too much information for the average home cook, but the point to take away is that the thickness of the cut is balanced to ensure even cooking. Now let's take a look at how easy this is.
How to Julienne Carrots:
Trim the carrot:
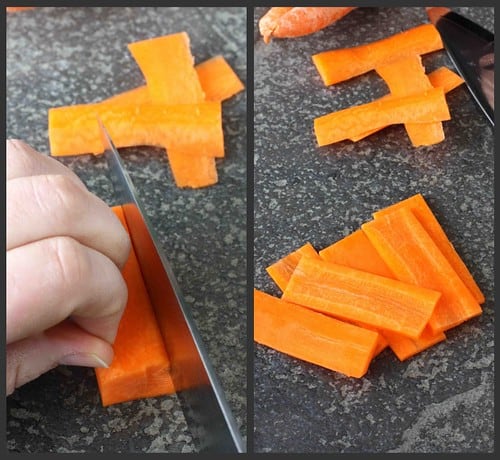
Using a 1 ½ to 2-inch piece of peeled carrot, cut off the four sides to form a rectangle. Trim the ends to make the piece even. The leftover pieces can be used for stocks, soups, or nibbling.
Cut into slices:
Cut the carrot into equal slices, lengthwise. The size of the matchsticks will depend on how thick these slices are. If you want thin matchsticks, then be sure to cut thin slices. The same reasoning follows for thicker matchsticks, also known as a batonnet cut. The thickness may vary from 1/16 to ¼ inch.
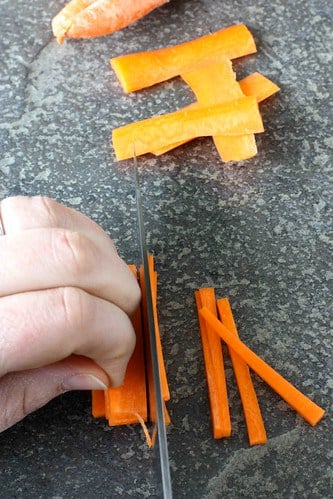
Stack & slice:
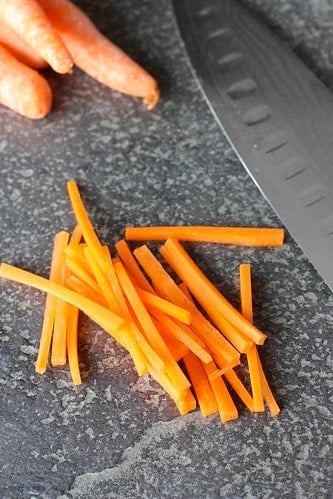
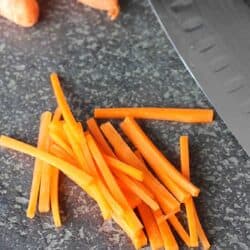
Stack the slices evenly, then cut through the stacks to form matchsticks. The slices should be the same thickness as the previous step so that the thickness is even all around the matchstick.
Continue with the remaining pieces of carrot until you reach the desired amount. See, wasn't that easy?

Other how-to cooking tutorials:
How to Chop an Onion
How to Hold a Chef's Knife & Cut with It
How to Make Turkey Gravy: Recipe & Troubleshooting
How to Julienne Carrots
Ingredients
- 2 large carrots
Instructions
- Using a 1 ½ to 2-inch piece of peeled carrot, cut off the four sides to form a rectangle. Trim the ends to make the piece even. The leftover pieces can be used for stocks, soups, or nibbling.
- Cut the carrot into equal slices, lengthwise. The size of the matchsticks will depend on how thick these slices are. If you want thin matchsticks, then be sure to cut thin slices. The same reasoning follows for thicker matchsticks, also known as a batonnet cut. The thickness may vary from 1/16 to ¼ inch.
- Stack the slices evenly, then cut through the stacks to form matchsticks. The slices should be the same thickness as the previous step so that the thickness is even all around the matchstick.
- Continue with the remaining pieces of carrot until you reach the desired amount.
Nutrition
This post was first published on February 5, 2001 and updated on August 3, 2021.
Disclosure: I am a participant in the Amazon Services LLC Associates Program, an affiliate advertising program designed to provide a means for me to earn fees by linking to Amazon.com and affiliated sites.
![]()

Michelle @ Brown Eyed Baker
This is an awesome tutorial! I will definitely be referring to it!
Eliana
Look at those perfect cuts! Thanks so much for sharing.
Tracy
Great information that I will definitely be putting to use in my kitchen!
Sprinkled with Flour
Thanks for the great tip! My current method of juliening (is that a word?), involves a very dull julien blade on my mandolin, and frequent near maiming of my fingers. This method seems much safer:)
Paula
oh, thank you for this tutorial! looks awesome!
Lizzy
Great info! I never have cut all the sides off to start...what a wonderful idea!! THANKS.
sara @ CaffeIna
Once again, thanks for the how-to. I feel my cutting skills are improving these days 🙂
marla
Thanks for another fabulous tutorial! You are really teaching me a lot & I am grateful for that.
Belinda @zomppa
Great tutorial! Thanks. I'm getting my new knife soon so I'll have to learn to do these better!