About three years ago, I took several cake decorating classes at a local craft store. While working to improve my skills covering cakes with fondant and molding little characters out of gum paste, I produced cake after cake for birthdays and holiday celebrations (you can check out a few of them here).
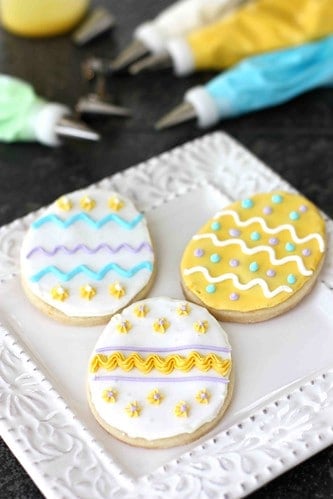
During those classes, we also learned how to work with royal icing, which included the skill of flooding cookies with icing. Flooding is a technique used to produce an even layer of icing on top of a sugar cookie. It is a canvas, if you will, for any type of decoration you can dream up. For our last Halloween party, and for several class parties at my boys’ school, I have made plain flooded cookies and then provided the kids with piping bags full of different colored icing and fitted with various decorating tips. Every child was excited to produce their own masterpiece. Some were very careful about piping intricate designs while others preferred to top their cookies with jumbled masses of colored icing. Each design seem to fit each child’s personality to a tee.
If you are looking for some decorating inspiration, be sure to check out I Am Baker, Brown Eyed Baker, Drop In and Decorate, Sweetapolita and Bake at 350.
How to do it:
The cookies:
One of the tricks to beautifully decorated cookies is starting with a good cookie recipe. You want something that tastes good, but want to avoid cookies that puff up, which makes decorating challenging. This sugar cookie from Martha Stewart or this shortbread cookie from Cake Journal are both good options. For a springtime taste, I usually add in a little lemon or orange zest.
Making the royal icing:
In the bowl of a stand mixer, combine 6 tablespoons meringue powder and 2 pounds icing sugar. Mix on low to combine. With the mixer set on medium-low speed, add warm water one tablespoon at a time. You will need 10 to 16 tablespoons, depending on how humid your climate is. Your goal is an icing of medium stiffness. Remember, you can always add more water later if needed. Mix for 7 to 10 minutes, or until the icing loses its sheen.
Royal icing dries out extremely quickly, so it is important to store the icing in a airtight container or cover with a wet towel when not using.
Divide the icing into separate bowls (the number of bowls will depend on the number of colors you will be using.) About 1/3 of the icing will be used for flooding the cookies, so set that aside in a separate bowl.
Outlining the cookies:
The easiest way to outline and decorate cookies is with a selection of piping bags, decorating tips and couplers, which can be bought inexpensively at many craft stores, such as Michael’s. If you are not planning to decorate often, you can buy a package of the disposable piping bags.
Fill a piping bag, fitted with a coupler and tip (I usually use a #3 tip for this), halfway with some of the icing. Be sure that the color of icing used to outline the cookie is the same as the icing used to flood the cookies later.
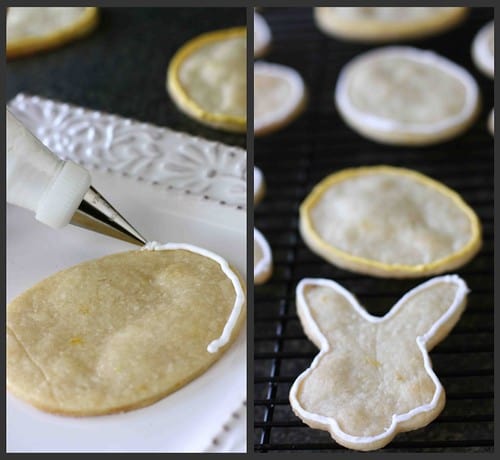
Twist the bag so that the icing doesn’t squirt out the top end, hold the bag at a 45 degree angle, and pipe the icing around the outside of each cookie. The icing will dry within minutes.
**Note: when you are not using the piping bag, rest the tip in a wet paper towel to avoid the icing drying and clogging the tip.
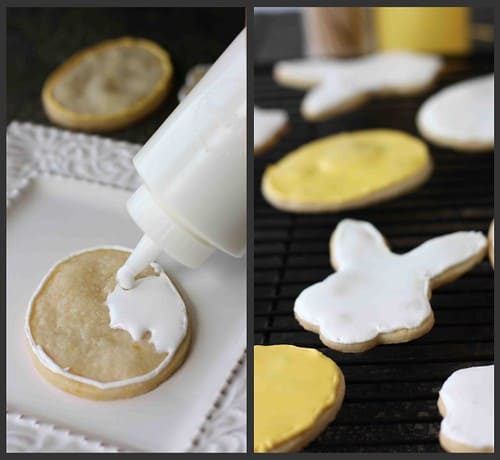
Flooding the cookies:
To achieve the proper consistency for the flooding icing, stir in water one teaspoon at a time. To test for the proper consistency, drop some of the icing back into the bowl of watered-down icing. The drop should “melt” back into the icing by the count of 10.
This runny icing can be applied from a piping bag, but I find it much easier to do it from a plastic squeeze bottle. When necessary, use a toothpick to push the icing into the corners.
Allow the flooded cookies to dry completely, about 2 to 3 hours.
Coloring and decorating:
To color the icing, use the gel colors available at many craft stores. Use a toothpick to transfer a small portion of the gel color to the icing. Stir thoroughly and add more color until the desired color is reached.
Prepare one piping bag for each color. Each one should be fitted with a coupler so that it is easy to exchange the various tips. My favorite tips for decorating cookies are numbers 1, 2 and 3 (simple lines at different widths) and number 18 (star tip).
Now, get out there, use your imagination and have fun!


{ 73 comments… read them below or add one }
Lots of inspiration available on my nonprofit organization’s blog, too. Drop In & Decorate cookies for donation serves communities all across the country by donating decorated sugar cookies. (http://www.dropinanddecorate.org)
Thanks, Lydia. I’m adding that into the post right now.
Thank you so much for this post! I actually have just one New Year’s Resolution this year, and that’s to find “My Go-To Sugar Cookie Recipe” and master the art of decorating with royal icing…this post is absolutely perfect! I’m still very far from achieving my goal, though I have made several attempts. I’ll definitely be referring back to these tips over the next several months.
Jess, I certainly hope this post will be helpful for you. Have fun experimenting and working towards your goal.
How darling are these cookies!? And what fabulous information! Love knowing which tips are your favorite! Thank you Dara!
Thanks so much, Wendy. We had fun making these cookies.
Great post; the cookies are so pretty.
Thanks, Kalyn. It was a great project for the kids.
Oh, the little eggs look lovely
very good idea for Easter cookies! even though I’m not a big fan of icing on cookies, I’ll try to use some of your tips in the future!
They are even more fun to make than they are to eat. Plus, they make great gifts.
How creative and talented you are. These cookies are great!
Thank you, Maris.
Gorgeously decorated cookies…you make it look so easy! I need all the tips I can get so thank you! You’ve been buzzed!
Liz, once you have done it a few times, it does become easy and really fun.
Great info! Taking a cookie decorating class has been on my list for a while as well.
Even though I don’t decorate a lot of cakes anymore, I am so glad I took those classes. They will be skills I use for life.
These Easter themed decorated cookies are so creative and cute, thanks for sharing your techniques to make them;-)
Thanks, Patty.
I just gave my first attempt at a sugar cookie and royal icing – love your egg designs!!!
They are lots of fun to make, particularly with kids.
I made cookies and frosted / flooded them for the first time this past Valentines… for first attempt they were pretty good, I need to work on my HAND not SHAKING so much during outlining!
these are beautiful!
Yes, controlling the hand-shake takes a little practice. I promise it will get a bit better each time.
This is my favorite “how to” so far! Thank you so much for this tutorial!!
Thanks, Katrina. I’m glad you found it helpful.
I’m always impressed by a well decorated sugar cookie, I know how much work goes into one. It seems such a shame to eat them afterwards!
I hear you! Luckily the kids don’t feel that way and will dig right in.
I love making decorating cookies!
Me too, Jen.
Cookie decorating is so fun!! Great tips Dara.
Thanks, Marla.
Your cookies are so cute and just perfect! What a great tutorial on decorating cookies.
Thanks, Lindsey. Believe me, there were a few practice cookies that didn’t make the cut.
Beautiful cookies and great tutorial!
Thanks, Shelby.
Adorable cookies with well-executed flood work…Easter is a week away, but these festive treats have me feeling like the bunny is hopping about my front yard! Your cakes are terrific too – the one of the kitten caught in the ball of yarn brought an instant smile. Brava Dara!
Thanks so much, Brooks. Even though decorating cookies and cakes can be time-consuming (as you well know from your beautiful cakes), it’s so gratifying to see how the finished product brings a smile to the recipient’s face.
I need the correct tools to decorate cookies. I’m on my way this week to get some tips for my daughters cupcakes. I love your cookies!
Thanks, Nichol. Luckily you can start with some pretty basic materials. Have fun!
I belong to a cooking group that meets at my home and we make something that most of the group have little experience with. This past December was cookie decorating and I know they want to do that again. This is a great idea for a step beyond the ‘beginners’ class I did!
Your cookies area adorable; all this talk of Easter on blogs is making me miss having little kids around to do these fun things with. And no…I am not ready for grandkids…just got the youngest moved out recently…but thanks!
Thanks so much, Barbara. I belong to a cooking group as well – we should definitely work cookie decorating into our rotation.
Cute Cookies and great piping! I have been meaning to take a class for forever. Mine are never this precise!
Heather, it just takes a little practice. I spent a lot of time practicing different lines and squiggles on pieces of wax paper.
Dara your cakes and cookies are true masterpieces, showstoppers. I was hoping to start those classes this month but there was a mix up at the craft store. I will be happy if I can achieve a quarter of your results. Hoping to begin in May. You are amazing, savoury and sweet – you are a Queen of food. It doesn’t matter what ingredients you are working with everything always looks mouth watering delicious. Would love to be a guest at your dinner table.
Thanks so much for your sweet comment, Grace. I would be happy to have you at my dinner table anytime!
I just love your ‘how to’s!’ I’m not really a baker but this just looks like so much fun I might see some Easter cookies in my future
Thanks for sharing!
Thank you. These are so much fun to do – go for it!
Love the demo Dara. Great technique. that piped boarder makes them look so professional.
Sommer, thank you. The piped border definitely gives the cookies a finished look, but it has a very practical purpose as well. It stops the flooding icing from leaking off the cookie.
Maww so cute! I love the eggs easter colors are the best!
Jess : )
Thanks, Jess.
I love your “How To” series:) I also like Martha Stewart’s recipe for sugar cookies. I do not bake too often, but several times a year I will do the decorating bit for the girls (I had a birthday party once for my November-born, where all the girls got to decorate their own Thanksgiving-themed cookies – they loved it, and I didn’t have to think of another form of entertainment:)
Your cookies are really pretty!
Just keep this posts coming – they are really appreciated:)
Thanks, Lana. The Thanksgiving-themed birthday party cookies sounds like such fun. It’s amazing how imaginative kids can be when given the opportunity.
I love the designs. I’m still too chicken to toss my hat into the ring with the cookie decorations.
Nice job Dara, so cute for Easter. Have a wonderful week and a Happy Easter.
Great post! And your cookies look so pretty!
Oh how lovely these cookies look! Thanks for the wonderful explanation. I doubt I will ever have that much patince to decorate and then eat my goodies
Stunning! Those eggs are ridiculously perfect! Forget marshmallow peeps!
Fun! Great job with these beautiful cookies
Beautiful tutorial Dara!!!
Super cute cookies! Perfect for Easter!
Loving these darling cookies! You really gave useful information too! I have a bit of an obsession when it comes to decorating cookies!
Lovely decorating tutorial Dara, your cookies turned out super cute!
Great tips!! Cookie decorating is so much fun. Love your Easter egg cookies!
Great tutorial Dara (love those bunny ears), and thank you for the shout out!
These are beautiful. I’ve signed up to a decorating course and I hope I’m 1/3 as good as you are.
I took a cake decorating class too but my creations are so so SO far from your cakes and cookies. Maybe I need to practice more
I love your cookies, Dara!! They turned out so cute!:)If I show my daughter she will beg me to make them for Easter:)Great job.
I LOVE the texture on these eggs! What a fun design!
These are such great tips and now I can’t stop thinking about making colorful sugar cookies for our family dinner on Sunday. I LOVE making sugar cookies! And your tips will make them look so much better too!
This is just gorgeous. I am so bad at decorating cookies because i have no patience for it
and they always turn out so sloppy. Once day i will master it.
very creative indeed!
One of my goals every year is to decorate my daughters BD cake- ha!. Lets start small by decorating cookies. This looks like its do able.
http://www.nycsinglemom.com
That’s a wonderful goal and you’re right – cookies are a great place to start. Good luck!
{ 3 trackbacks }