• Skip to primary navigation
  • Skip to main content
  • Skip to primary sidebar
Cookin Canuck
  • Recipe Index
  • 30 Minute Meals
  • Cooking 101
  • Instant Pot Recipes
  • About
  • Subscribe
menu icon
go to homepage
  • Recipes
  • Quick&Easy
  • Instant Pot
  • About
  • Subscribe
    • Facebook
    • Instagram
    • Pinterest
  • subscribe
    search icon
    Homepage link
    • Recipes
    • Quick&Easy
    • Instant Pot
    • About
    • Subscribe
    • Facebook
    • Instagram
    • Pinterest
  • ×

    Home » Desserts » Cookies & Bars

    Halloween Mummy Cookie Recipe

    Published: Oct 21, 2011 · Modified: Mar 30, 2021 by Dara · This post may contain affiliate links. As an Amazon Associate I earn from qualifying purchases. · 39 Comments

    4Shares
    Jump to Recipe

    Halloween Mummy Cookies Recipe

    Last week, I lamented over my lack of creative ability when it comes to holiday crafts and I reached to you for some help. Well, you came through with flying colors, linking up your wonderful Halloween recipe and craft ideas. There are so many of them that I plan to try and the first on the list were the mummy cookies from Lana of Never Enough Thyme. Lana's post includes the mummy cookies, as well as several other fun Halloween treat ideas.

    I provided the directions for making your own frosting, but store-bought icing and sugar cookies will work, too. The most important thing is having fun, which is impossible to avoid when you mix kids and icing bags.

    How to do it:

    The cookies:

    One of the tricks to decorating cookies is starting with a good cookie recipe. You want something that tastes good, but want to avoid cookies that puff up, which makes decorating challenging. This sugar cookie from Martha Stewart or this shortbread cookie from Joy of Baking are both good options.

    The icing:

    In the bowl of a stand mixer, combine butter, milk, vanilla extract and powdered sugar. Mix on low to combine, then turn to medium speed until light and fluffy, 3 to 4 minutes.

    Scoop half of the icing into a bowl and set aside. To the icing in the mixer, add unsweetened cocoa powder and 1 tablespoon milk. Mix until combined.

    MummyCookies1

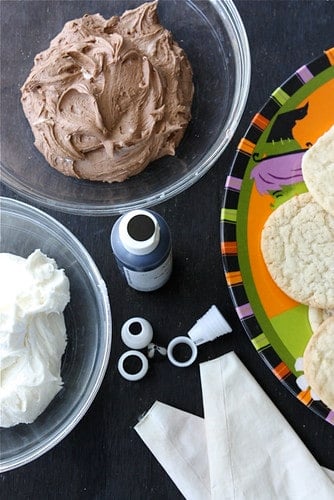
    Stir in drops of black icing color (found in most large craft stores, such as Michael's and cake decorating stores) into the chocolate icing until it turns black. This will make enough icing for 16 cookies.

    Decorating the cookies:

    The easiest way to decorate cookies is with a selection of piping bags, decorating tips and couplers, which can be bought inexpensively at many craft stores, such as Michael’s. If you are not planning to decorate often, you can buy a package of the disposable piping bags. Alternatively, you can scoop the icing into a ziploc bag and cut off a small corner of the bag to squeeze out the icing.

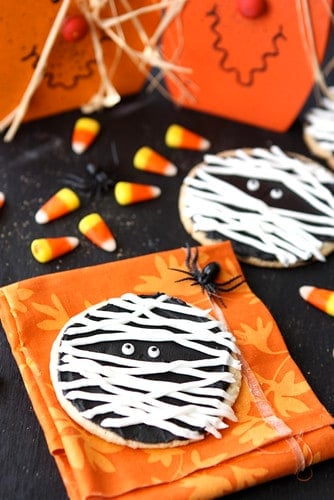
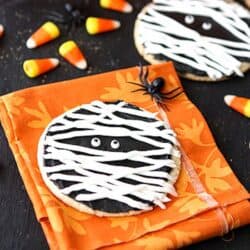
    Using an offset spatula, cover the cookies with black icing.

    For the eyes, we used #3 and #1 tips for the white and black parts of the eyes, respectively.

    Mummy Cookies Collage 1

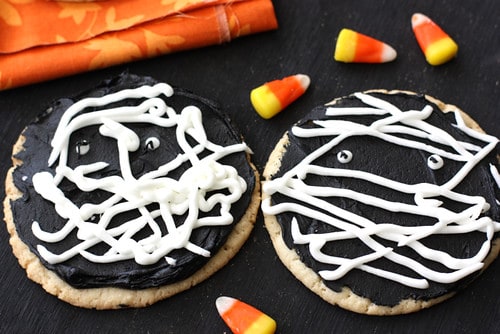
    Switch the tip on the white icing to a #5 for the mummy cloth strips. Make various strips across the cookies, surrounding the eyes.

    Mummy Cookies Collage 2

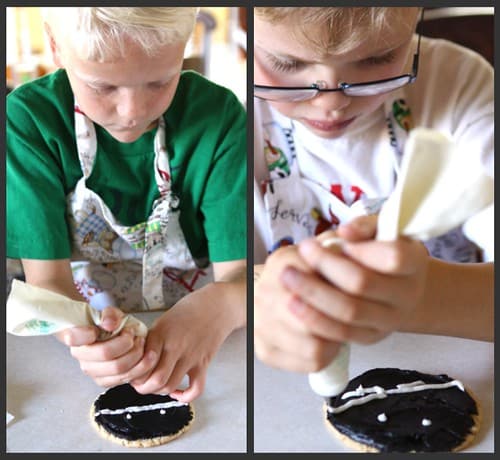
    The boys diligently decorated each cookie, thoroughly covering themselves in icing - the sign of a good cookie-making session. The boys picked out their favorite pictures for the photo.

    MummyCookies6

    And then...the best part. They were very proud of their handiwork and more than happy to take the honor of eating the first cookies.

    Mummy Cookies Collage 3

    For more ideas on decorating cookies, head to How to: Decorate Cookies.

    Cookie Icing

    Pipe this easy cookie icing onto your favorite sugar cookies. Easy to color as needed.
    5 from 1 vote
    Print Pin Rate
    Course: Desserts, How To
    Cuisine: American
    Keyword: Cookies and Bars
    Prep Time: 15 minutes
    Total Time: 15 minutes
    Servings: 16 to 20 Cookies Worth Of Icing
    Calories: 167kcal
    Author: Dara Michalski | Cookin' Canuck

    Ingredients

    • ½ cup unsalted butter softened
    • ¼ cup milk room temperature
    • ½ teaspoons vanilla extract
    • 1 pound powdered sugar
    • 3 tablespoons unsweetened cocoa powder
    • 1 tablespoons milk
    Prevent your screen from going dark

    Instructions

    • In the bowl of a stand mixer, combine butter, milk, vanilla extract and powdered sugar.
    • Mix on low to combine, then turn to medium speed until light and fluffy, 3 to 4 minutes.
    • Scoop half of the icing into a bowl and set aside.
    • To the icing in the mixer, add unsweetened cocoa powder and 1 tablespoon milk. Mix until combined.
    • Stir in drops of black icing color (found in most large craft stores, such as Michael’s and cake decorating stores) into the chocolate icing until it turns black. This will make enough icing for 16 cookies.

    Nutrition

    Calories: 167kcal | Carbohydrates: 29g | Protein: 1g | Fat: 6g | Saturated Fat: 4g | Cholesterol: 16mg | Sodium: 4mg | Potassium: 19mg | Fiber: 1g | Sugar: 28g | Vitamin A: 185IU | Calcium: 8mg | Iron: 0.1mg
    Tried this recipe?If you make this recipe, I'd love to see it on Instagram! Just use the hashtag #COOKINCANUCK and I'll be sure to find it.

    4Shares
    « Easy Shrimp, Mushroom & Soba Noodle Soup Recipe
    Asian Slaw with Cashews, Pear & Ginger Dressing »

    Want more easy, healthy recipes?

    Subscribe to get the recipes sent straight to your inbox.

      We won't send you spam. Unsubscribe at any time.

      Reader Interactions

      Comments

      1. cecilia

        September 09, 2015 at 6:08 pm

        I am not a baker, throw me a life jacket haha Anyhow is there a cookie a person can purchase at the store that can do. I can make the frosting though, plz help

        Reply
      2. Katherine Martinelli

        October 30, 2011 at 6:11 am

        These (and your kids!) are too cute! Thanks for linking up at my Halloween blog hop 😀

        Reply
      3. Donna

        October 27, 2011 at 2:13 pm

        So, so darling - and looks easy!

        Reply
      4. Nichol

        October 27, 2011 at 1:47 pm

        I am not at all creative when it comes to decorating and baking. These however look so fun and perfect for kiddos!

        Reply
      5. Linda

        October 27, 2011 at 12:39 pm

        How fun!! And I love seeing the boys decorate the cookies!! I so miss having my kids at that age! Halloween is still my favorite time, but so very different now!

        Reply
      6. Liz

        October 27, 2011 at 10:08 am

        These are the best Halloween cookies I've ever seen! So darn cute. And I think even I might be able to pull off this decorating technique 🙂

        Reply
      7. megan @ whatmegansmaking

        October 25, 2011 at 1:23 pm

        These are so fun!! Love that kids can do them too. 🙂

        Reply
      8. Angie

        October 24, 2011 at 12:55 pm

        TOO cute!

        Reply
      9. Nutmeg Nanny

        October 24, 2011 at 12:43 pm

        How fun! The kids look like they are having a blast decorating these cookies.

        Reply
      10. SMITH BITES

        October 24, 2011 at 5:19 am

        i'm not sure which is cuter . . . the cookies or your kids!!!

        Reply
      11. Sandy

        October 23, 2011 at 2:28 pm

        Dara! These are soooo adorable! Not the cookies, your boys. Well, the cookies too. The pictures of making these with your sons are real treasures.

        Reply
      12. Alison @ Ingredients, Inc.

        October 23, 2011 at 2:18 pm

        omg love these!!

        Reply
      13. Suzanne

        October 22, 2011 at 9:26 pm

        cute a simple perfect for kids 🙂

        Reply
      14. Sue

        October 22, 2011 at 8:56 pm

        Such adorable cookies! Beautiful photos too! Your baking apprentices are so cute~love the tinted teeth after eating the cookies:)

        Reply
      15. Heather | Farmgirl Gourmet

        October 22, 2011 at 8:31 pm

        Cute cute cute!! I think the boys looked like they enjoyed themselves! 🙂 Great post.

        Reply
      16. Marla

        October 22, 2011 at 12:56 pm

        Dara, LOVE this post. Totally pinned. Great job on the cookies 🙂

        Reply
      17. Curt

        October 22, 2011 at 10:08 am

        Those are very cool looking. You did a great job! You're right, there are a lot of creative ideas out there!

        Reply
      18. Angela and Marilena

        October 22, 2011 at 9:52 am

        Love the idea, so creative! They look so cute!

        Reply
      19. Island Vittles

        October 22, 2011 at 9:50 am

        These are great -- kids will love them, but they're simple enough for even non-artists like me to pull them off. Great idea! Theresa

        Reply
      « Older Comments

      Leave a Reply Cancel reply

      Your email address will not be published. Required fields are marked *

      Recipe Rating


      Primary Sidebar

      • Facebook
      • Instagram
      • Pinterest
      • Twitter
      Photo of Dara Michalski.

      Hi there! Welcome to Cookin' Canuck.

      I'm Dara, a Canadian living in the U.S. and sharing my favorite healthy recipes. My cooking motto is that healthy eating never needs to be boring!

      More about me →

      Popular

      • Strawberry Nice Cream
      • Lemon Orzo Salad
      • Sautéed Corn, Zucchini & Blistered Tomatoes Recipe
      • Grilled Halloumi Cheese Recipe

      Footer

      ↑ back to top

      About

      • Meet Dara
      • Contact
      • Work With Me
      • FAQ
      • Privacy Policy

      Newsletter

      • Sign Up! for emails and updates

      Recipes

      • All Recipes
      • Main Dishes
      • Instant Pot Recipes
      • 30-Minute Meals

      I am a participant in the Amazon Services LLC Associates Program, an affiliate advertising program designed to provide a means for me to earn fees by linking to Amazon.com and affiliated sites.

      Copyright © 2022 Cookin' Canuck