Make your meal prep time faster by mastering how to peel and mince garlic quickly and safely. The flavor beats bottled garlic every time!
Looking back on my first attempts at cooking, I am surprised that I was able to put something even remotely edible on the table, considering how little I actually knew. Peeling and mincing garlic was definitely one of those things that tripped me up. I'd resort to my old, clunky metal garlic press. It would mince that garlic relatively well, but then I'd have to spend the next 10 minutes cleaning the darn thing. Of course, I could have resorted to the pre-minced bottled garlic. Hmmm...
A couple of weeks ago, an acquaintance asked me if I used the bottled garlic. I'm certain that the horrified look that crossed my face completely offended her. Don't get me wrong; I know that scooping out a dollop of pre-minced garlic makes meal prep more efficient. However, the minute of time that I save is not worth the compromise in taste. I promise that peeling and mincing fresh garlic will take you no more than a minute or two, especially when you get the hang of it. I figured this was the perfect topic for the next installment in my "How to" series.
How to peel garlic
The first thing you want to do is remove the papery skin from the outside of the garlic clove. When I first starting cooking, I tried to do this in a variety of ways - peeling with a small knife, pulling at the skin with my fingers and using those rubber rolling tubes. All left me frustrated and, inevitably, with little pieces of papery skin sticking like glue to my fingers.
The easiest way to remove that papery skin is by smashing it off. That's right, this is where you get to release all of those pent-up aggressions from the day.
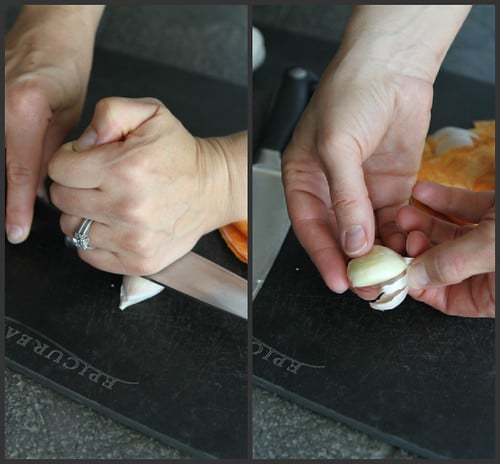
Place the clove underneath the heel end of the blade of a chef's knife and pound on the smooth surface of the blade with your fist. It should just take one or two pounds to do the trick. This will not work with a small paring knife, so be sure to pull out your chef's knife for this job.
Now use your fingers to completely remove the skin.
How to mince garlic
Now that the papery skin is gone, it's time to start slicing and dicing. This process is virtually identical to the technique I showed in How to: Chop an Onion.
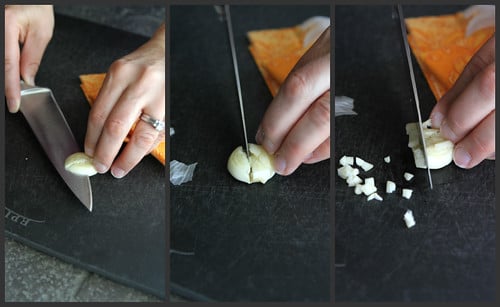
First, carefully make a horizontal slice through the clove. Watch those fingers!
Next, cut several parallel slices from the root end of the clove (where the woody stem is located) to the tip of the clove.
Finally, cut across the clove in the opposite direction to make small diced pieces.
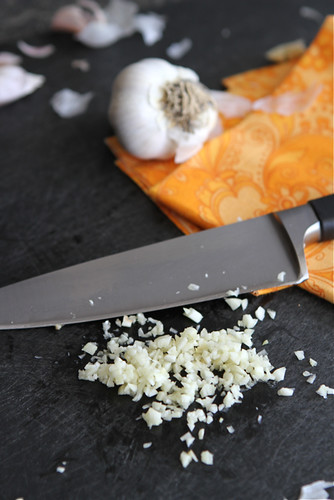
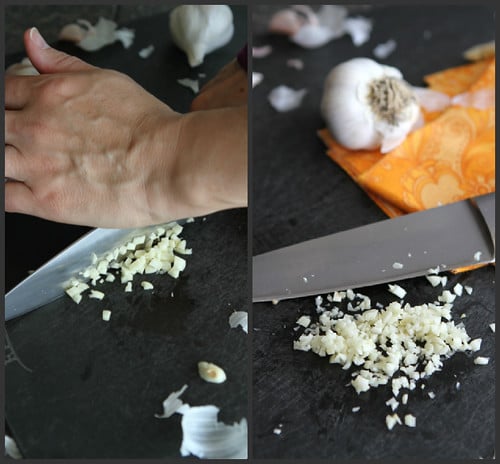
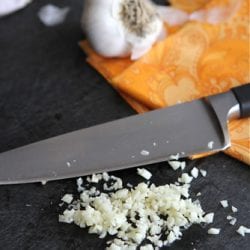
The last step is to mince the garlic. Using the middle to the heel end of the blade, place the blade in the middle of your pile of diced garlic. Place your non-dominant hand on the of the blade (the dull edge) and use a rocking motion to mince the garlic with the blade. The tip end of the blade should rest on the cutting board the whole time. Sweep the accumulated garlic off the blade as needed.
That's it! A perfectly minced clove of garlic in a matter of seconds.
Recipes using minced garlic:
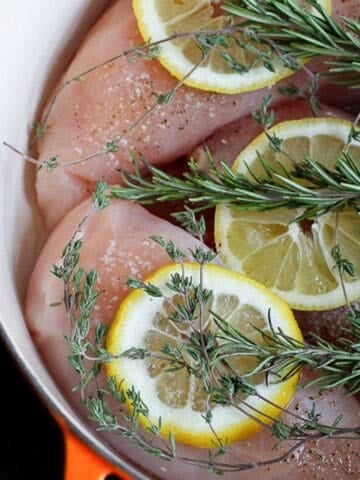
Chicken Stir Fry Recipe with Broccoli
Baked Teriyaki Turkey Meatballs
Healthy Lasagne with Turkey, Pesto & Peppers
Want to save this recipe?
How to Peel and Mince Garlic
Ingredients
- 1 garlic clove or amount needed for recipe
Instructions
Peel the garlic
- Place the clove underneath the heel end of the blade of a chef's knife and pound on the smooth surface of the blade with your fist. It should just take one or two pounds to do the trick. This will not work with a small paring knife, so be sure to pull out your chef's knife for this job.
- Now use your fingers to completely remove the skin.
Mince the garlic
- First, carefully make a horizontal slice through the clove. Watch those fingers!
- Next, cut several parallel slices from the root end of the clove (where the woody stem is located) to the tip of the clove.
- Finally, cut across the clove in the opposite direction to make small diced pieces.
- The last step is to mince the garlic. Using the middle to the heel end of the blade, place the blade in the middle of your pile of diced garlic. Place your non-dominant hand on the of the blade (the dull edge) and use a rocking motion to mince the garlic with the blade. The tip end of the blade should rest on the cutting board the whole time. Sweep the accumulated garlic off the blade as needed.
Disclosure: I am a participant in the Amazon Services LLC Associates Program, an affiliate advertising program designed to provide a means for me to earn fees by linking to Amazon.com and affiliated sites.
![]()


Michel in Quebec
Quote: "The last step is to mince the garlic. Using the middle to the heel end of the blade, place the blade in the middle of your pile of diced garlic. Place your non-dominant hand on the of the blade (the dull edge) ...."
That turns out funny. Of course press on the dull edge. 🙂
There's nothing wrong with specifying that whatsoever and it might possibly help some people to avoid making the mistake of pressing on the sharp edge of a knife. (Ouch!) But you have to admit that it's funny that this warning would ever need to be stated. It's much funnier than placing your hand and pressing on the wrong side of a sharp knife, for that's not funny at all. I have a very small knife that's very sharp and I use it for small tomatoes, radishes, cucumber (not large ones), ..., and I've only pressed, sometimes, but when I did that, then the very sharp edge pressed against another finger (wasn't using a cutting board or plate) and this little knife left a very small cut, but it was painful. It was like a burning, very stinging sensation.
So, definitely be careful when working with sharp instruments. My cuts weren't serious, but they were painful. And I've started to use that little, actually tiny, knife to cut the same foods on a wood cutting board. I'm a little tired of cutting my fingers. Again, not serious cuts, definitely not needing to see an MD or even pharmacist, but those cuts are painfully annoying.
Even paper cuts can be painful. I've also cut myself a couple of times with some grass, though don't know what kind. It was called grass though. But the little knife left longer-lasting pain that was annoying. Very tiny, shallow cuts, not even spilling blood (not always anyway), but still painful and this sometimes lasted 2-3 days.
Always be careful when working with any sharp instruments or materials. And if you're going to be hit in the head with a 2x8, then try to be hit with the flat side. 🙂
Deborah
You are so natural on tv!! There is very litle that is better than freshly minced garlic to me. Mmmm! (and thanks for the link!)
Chung-Ah | Damn Delicious
Great tutorial. I didn't know how to peel garlic for the longest time. And I absolutely hated how the smell would get trapped underneath your fingernails. So for a while I had to buy the peeled bags from Trader Joe's. Shameful, I know but how was I supposed to know that all you had to do was pound it?
Maureen @ Orgasmic Chef
I've never used garlic from a jar either. It just sounds gross to me. Surely the garlic loses something from sitting in a jar all that time.
You're very cute on TV 🙂
Miss @ Miss in the Kitchen
Love your tutorials! I so agree with you on the jarred garlic versus fresh, no comparison!
Barbara | Creative Culinary
I just recently convinced my daughter to forgo the press and start to mince with a knife; the presses are easy enough I guess but not so easy to clean and there is so much waste. It took her some time to get comfortable with the rocking business using a chef's knife but once she got the hang of it...she got it!
Great series and you? Great in the video!