Learn how to segment an orange, or other citrus fruit such as grapefruit, to make the prettiest presentation when serving them in a salad.
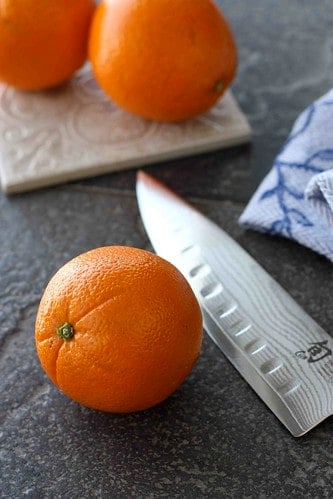
Each time we travel to California for Christmas, I become mesmerized by the brightly colored globes of fruit dangling from my in-laws' citrus trees. The navel oranges are filled with sweet juice, which drips down our chins and arms as we suck on wedges at breakfast time. Just before we leave for home, my father-in-law picks a generous selection of the orange fruit and Meyer lemons for us to take with us. We happily tuck our bounty into the car and begin dreaming of the desserts, salads, and drinks we can make with our stash.
When using oranges in recipes, it is preferable to extract the edible part of the fruit, leaving the membranes behind. Yes, the membranes are edible, but often get in the way when making salads and sauces. This method of remove the segments is easy, and allows the fruit to remain intact, which looks appealing in many dishes.
Be sure to check out my how-to tutorials.
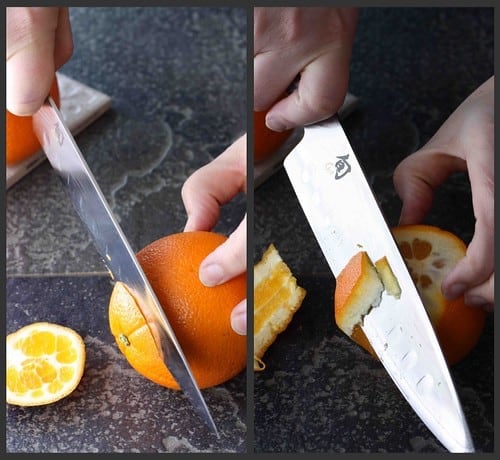
How to segment an orange:
Cut off both ends of the fruit and rest the fruit on one of the flat ends.
Starting at the top of the fruit and using the middle of the knife blade, cut away the skin and pith.
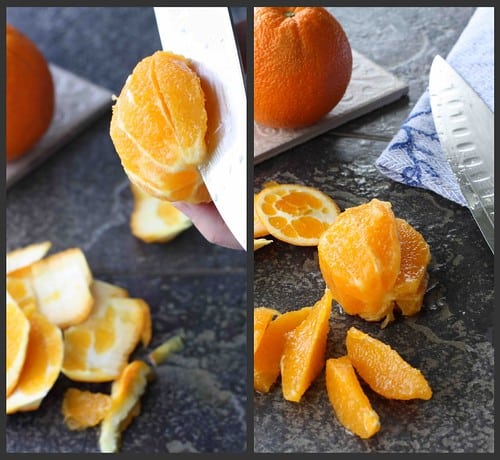
Slice each segment away from the connective membranes and use the knife to scoop the segments away from the fruit.
Now go enjoy the season's sweetest fruit!
Want to save this recipe?

How to Segment an Orange
Ingredients
- 1 navel orange or other citrus fruit
Instructions
- Cut off both ends of the fruit and rest the fruit on one of the flat ends.
- Starting at the top of the fruit and using the middle of the knife blade, cut away the skin and pith.
- Slice each segment away from the connective membranes and use the knife to scoop the segments away from the fruit.
Disclosure: I am a participant in the Amazon Services LLC Associates Program, an affiliate advertising program designed to provide a means for me to earn fees by linking to Amazon.com and affiliated sites.
![]()


Anonymous
This is beautifully done but I have to comment, some of us are just segmenting challenged! I grew up watching my mom do this with ease... she tried to teach my sister and I... neither of us can do it well after forty years of trying. So don't be discouraged if this still doesn't 'cut' it for you.
warmvanillasugar
You have saved me. Let's face it, I'm weird. I will not under any circumstances peel my own orange. I don't like the rind getting under my nails. This is the solution I've been looking for since I left home!! THANK YOU!
Ang
Okay, love the knife! This makes me very parched. I need some fresh orange juice. 🙂
Cookin' Canuck
Thanks for all of your comments. I'm glad everyone finds this tutorial helpful.
Kay - The knife is a Shun and I absolutely adore it!
Kay Heritage
Great looking knife! What is the brand, Dara? Love your tutorials!
Elin
Hey CC...thanks for sharing . Great tutorial 🙂 Thanks for sharing and now I know how to segment an orange neatly .
Have a great weekend 🙂
Elin
Tricia @ Saving room for dessert
Wow - I never knew you could do that! I feel funny saying that but thanks so much! I will give it a try and I can't stop thinking about that Focaccia bread. I think I have to make it tomorrow. Thanks again.
thenewlywedchefs.com
Not only is this post super informative, but the picture is BEAUTIFUL!
Pegasuslegend
Awesome instructions! This is perfect!
Chef E
I love citrus! Great tutorial...